The Saw Blog has moved!!!

I’m very happy to announce that The Saw Blog has a new home in cyberspace! I’ve acquired a new domain for the blog and will now be at:

http://thesawblog.com/

Other than the address, the appearance should be just about the same. So please update your links, browsers and favorites with our new address. Soon all traffic will be automatically diverted to the new address, but in the mean time you can navigate there manually.

Over the next few weeks I’ll be changing a couple of things to make the new blog a little easier to navigate…and adding some features as I’m able. Please notify me of any bugs or glitches, and please let me know if you have any thoughts, suggestions or questions. I can be reached at: matt@thesawblog.com.

Thanks for all the support and for making The Saw Blog such a success!!!

Keep makin’ saw dust…

-Matt

Published in: on September 15, 2011 at 11:32 am  Leave a Comment  

Contact Info

Some people are wondering how to contact me….well, I’ve got a new email address and also will soon be launching a new site. I figured I’d start using the new email though, so here goes….

If you have questions, inquiries about sharpening services or restoration, or just want to chat about saws, feel free to email me at:  matt@thesawblog.com

Thanks!

-Matt

Published in: on August 16, 2011 at 8:47 am  Leave a Comment  

Dovetails a la Underhill….

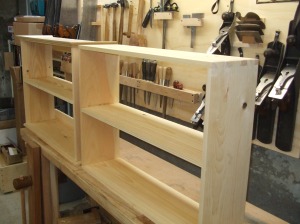
It was my birthday last week, and despite being buried in saw work, I figured I deserved some woodworking time on my special day. So, I took a couple hours to make some new bookshelves I need for our living room. My collection of woodworking and history books is growing by leaps and bounds (when I’m not in the shop, I always have my nose in a book) and I’m running out of places to pile them up.

So, I came up with a quick and simple design for some dovetailed shelves that would also let me try out a dovetailing method I read about in one of Roy Underhill’s books. Roy is my absolute woodworking hero and I adore his work. Ever since I read about this particular method of cutting the tails for a DT joint I have wanted to try it. What struck me about his method, which I’ve never read or seen anywhere else, is that besides the base line, there is no marking involved for the tails. So all you need to make them is your board and a saw. No knife, no pencil, no DT gauge or bevel gauge and no dividers or rule to lay out the spacing. You don’t mark the tails at all…you just cut everything by eye. Cool, right???

So let’s get to it and you’ll see what I mean…

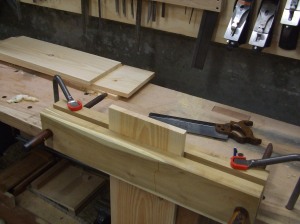
After I mark the baseline for the thickness of the stock on the tail board, I clamp it up in my Moxon twin screw vise. In my mind, for a 9 and 1/2 inch deep bookshelf case, I see three large dovetails joining each corner of the case. It’s with this layout in mind that I begin…

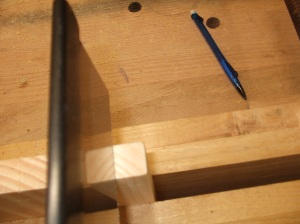
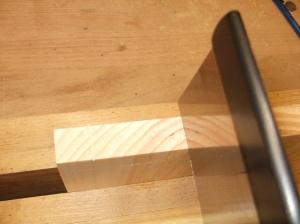
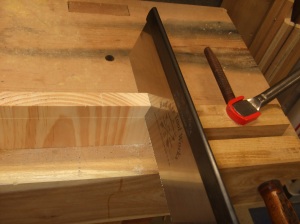
To start the first tail, I grab my saw and make a shallow kerf to define the edge of the first tail by drawing the teeth back along the end grain. As you can see, there’s no mark what so ever for the tail cuts…I just guesstimate about 3/4 to an inch in from the edge of the board and pull back to establish the cut line. And this is the great part of Roy’s method…you lay everything out by eye and don’t mark anything…

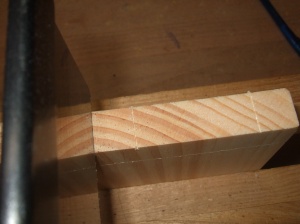
Then, I switch to the other side of the board to define the cut line for the edge of the opposite tail. Same thing here….eyeball about an inch in and draw the saw back to establish a kerf line….

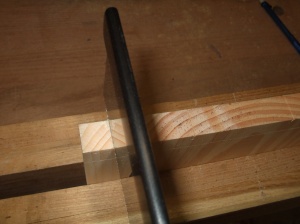
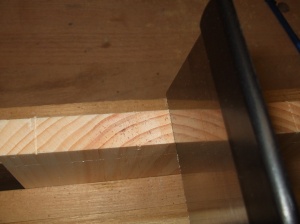
The trick here is to use the shiny saw plate to ensure that this kerf line is square. You can see the reflection of the board on the saw plate, and once you line it up equally in the reflection, you know you’re square and you draw back the teeth to mark the kerf.

Next, I cut the kerf defining the size of the first tail. I estimate about two inches from the first kerf and draw back with the saw…

Now the same thing with the second tail…about two inches wide…

We’ve now defined the width of our two outside tails and can focus on the middle tail. I define the middle tail about 3/4 of an inch from the right side tail…

And the other side as well…

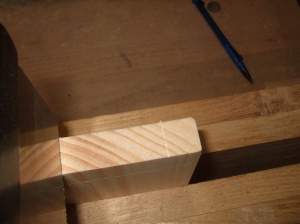
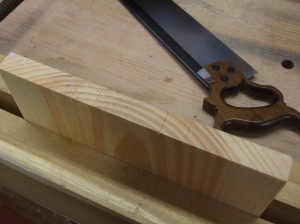
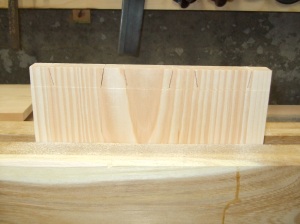
And here’s the tail cuts kerfed out and ready to be cut…

Now I’m ready to cut my tails…and here’s the fun part. Again, there’s no marking here…no definging the slant of the tail with a knife line or pencil mark. I just estimate the slant of the tail by eye and tilt my saw accordingly, then start cutting. And once you’ve cut a few dovetails, you’ll get to know how the saw should feel for the proper angle…in fact, there isn’t really a “proper” angle at all. Its more of an angle that can be too sharp or not sharp enough. As long as you stay inside of those outside parameters, you’re dovetails will be just fine. So here goes…

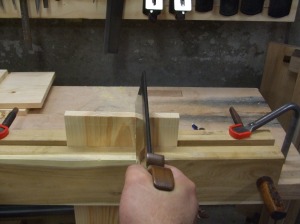
Place the saw teeth in the first kerf, angle it slightly to the right and start sawing…

I make all of the right slanting tail cuts together…1, 2, 3. Here you can see the angle I’m cutting at a bit better…again, I’m just going by feel here…

I make the last right slanting tail cut, then go back and make my left slanting cuts to complete the tails. Here they are all cut…

Not bad for no layout marks…and man was this quick!

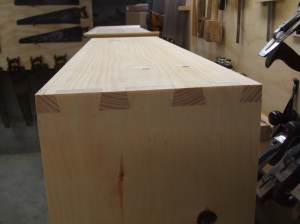
Now its a simple matter of cutting the rest of the tails for the case, removing the waste and paring to the baseline. After that, I match up my tail board to my pin board to mark the cuts with a pencil, and then it’s dovetailing as normal. Of course, I don’t mark the pin cuts on the face of either board….I just mark the slope of the tail on the end grain and saw straight down. But like I said, that’s all standard dovetailing…its really the lack of making any initial lay out marks that makes this method so freakin’ cool!

Now I know what you might be thinking….your probably telling yourself that this is cazy…how can you ensure that all of the tails are even and spaced properly???  How can you ensure that your tails are going to be uniform and perfect and esthetically pleasing????

Here’s the thing…dovetails don’t have to be perfect. In fact, they are more historically correct and look better when they are not perfectly sized and laid out. You want machine shop precision in your woodworking? Get a Shopbot and make your furniture like a cyborg…lifeless and dead inside. Me…I like traditional and human. And once you see the finished product, I think you’ll agree…dovetails laid out and cut by eye are very pleasing. It’s all about letting go of your precise marking gadgets and letting your sense of natural proportion take over. Your brain is surprisingly precise without any guides. Plum, level and true are pretty well programmed inside you. Let go and allow yourself to know them and you’ll spend a lot more time sawing and chopping and less time marking and measuring.

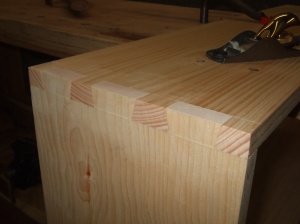
Still don’t believe me? Here’s the case glued up and trimmed flush ready for planing…

I’m pretty pleased with this method…thanks Roy! 🙂

And since this was so much fun, I ended up making a second book shelf…and this one was even quicker. The whole thing went together from 8 foot planks to a  glued up case in about two hours.

After I finished the first one, I decided to dress them up a bit with some nice simple crown molding and base quarter round. Even though it covers up the dovetails, they were a little too plain for our living room…

‘Til next time!

🙂 Matt

Published in: on August 12, 2011 at 7:48 pm  Comments (11)  

Sharpening Update

I’m very happy to report that I’ve been completely inundated with saws for sharpening and repair since hanging my shingle two months ago. This is a great sign for the hand tool revival…..it tells me that you guys and gals love your hand saws and want more.

But unfortunately, this deluge of saws has bloated my turn around time into the 8 week range. So if you’ve sent me a saw recently and are wondering where it is, feel free to drop a line, but know that I will be adding a few weeks to what ever original estimate I provided. If this is concerning for you, please don’t hesitate to let me know and I will make amends to your satisfaction.

On a side note, in the little spare time I have had lately, I’ve been busy planning a lot of new things for my blog and business…stay tuned and thank you for your patience!

-Matt

Published in: on July 24, 2011 at 9:56 am  Comments (5)  

Don’t Hang Yourself: Tote angles change your saw…

Lets play a game.

Look at these two pictures and see if you can find what’s different about the tote on each saw:

16 in. Tenon saw by Adam Cherubini

Model 77 Back SawWenzloff & Sons Disston #77

What do you notice?

Not sure? Lets try again….look at the totes on these two saws…

BA10_1Bad Axe 10 inch Dovetail Saw

Dovetail SawLie-Nielsen Dovetail saw

Are you starting to notice something?

The big difference is in how the saw is hung (no, not that way…get your mind out of the toilet). The “hang” of the saw refers to the angle of the tote in relation to the tooth line. And this is not simply an aesthetic detail….in fact, its one of the most important factors in the design of any hand saw. Why? Because it changes the way the saw cuts.

In each pair of pictures, the first saws shown (the Cherubini and the Bad Axe) both have tote angles more perpendicular to their tooth line; this is more “aggressive” hang. The second saws in each pair (the Wenzloff and the Lie-Nielsen) have totes that more approach a parallel with the tooth line; this is more “relaxed” hang.  

So what you say? Read on…

Imagine you had to push a 6 ft. tall wardrobe chest across a carpeted bedroom. If you stand behind the chest and push high up on the back, its likely to dig the feet into the carpet, be difficult to steer, and maybe even tip over. Not good. Now, imagine pushing from low down on the body of the chest. It moves more smoothly, the feet don’t dig into the carpet, and you can steer much easier with more subtle movements. Why? Because you’ve gotten below the chest’s center of gravity and you’re using its mass to help stabilize it as you push. Which method would you rather employ? The latter, of course.

Now what the heck does moving furniture have to do with sawing? A lot….its all physics. If you swap out the wardrobe for a saw, and switch the carpet for your cut line you’ve got the crux of this argument. And here it is: If you want more control over your back saw, then try a more aggressive hang angle because it will put the thrust of your stroke more below the saws center of gravity and BEHIND the cut instead of on top of it.

Get it? Good. Now lets take a break from physics and talk about history…

The first form of large back saws are much like the Cherubini shown above…very aggresively hung. Most of the 17th, 18th and many 19th Century tenon and sash saws have a similar form. In the mid 19th century however, Americans started messing around with traditional saw forms (a big no-no in England if you didn’t want your shop burned to the ground!) and in particular, they started making almost all of their back saws with more relaxed hang. Why? Some say it is because a more relaxed hang let the user leverage downward pressure with the tote and allow a dull saw to continue cutting, thus saving the worker time in needing to stop and sharpen his saw. It also may have been to make the saw more comfortable for use on benches of differing heights and in different locations outside of the shop. Another factor to keep in mind is that as machinery took over work previously dominated by hand tools, industry and craft work began to dismantle its attachment to effective tool forms in pursuit of mechanization and mass production.

But what relaxing the hang also accomplished was to make the saw more difficult to cut properly with, in my opinion. So, if you’ve ever been frustrated by sawing dovetails, tenons, shoulders, dados, or any joinery with a back saw for that matter, than this may be the reason why. Try using a saw with an aggressive hang and low center of gravity and your eyes will be opened to why traditional forms may be better.

Now I’m not trying to say that the more American pattern of back saws with relaxed hang angles are poor…they are great saws, and God knows I love Henry Disston, but how a saw is hung can make a HUGE difference. And I like aggressive hang on my saws…the control in the cut is unequalled. Try it and see. You can thank me later.

-Matt

Published in: on July 18, 2011 at 10:13 am  Comments (19)  

An epiphany of steel and wood…

I just got this email from a customer and can’t help but share it. He recently sent me a saw to sharpen and let me know that he was new to hand saws and had no experience with them. Here is the email he sent after receiving the freshly sharpened saw…

Hi Matt,

Got the saw in the mail….    SWEEEEEEEEEEEEEEEEEEEETT!!!!!!!!!!!!
 
I am honestly trying to get the f-word out of my vocabulary.  Two decades in construction makes for strong habits.  I’m actually doing pretty good with this effort, but the only way I can really convey anything in an email is to say:
That saw is f——— MONEY!!!!!!!!!!!!!!!!!!!!!!!!!!!!!!!!!!!!!!!!!!!!!!
 
WOW.  I had no idea a handsaw could do that!  I crosscut some oak and maple rough stuff I have lying around, and it’s really unbelievable!  And tracking?!  With no marks and just by eye the cut was straight and virtually square in both planes–NOT perfect, but WOW.  Fairly effortless too.  OK, I’m hooked.
 
I really want to thank you, Matt.  You’ve opened up a whole new world for me.  Just awesome!
 
-Bill

On the surface, this may seem like a shameless plug (well…it is) but it’s also much more…..its the whole reason why I love saws and woodworking and hand tools.

The experience that Bill is describing above is a life changing moment. Every craftsman remembers the first time he used a well tuned hand saw…I certainly remember mine. This epiphany does not have to be an isolated incident….it is happening all over the world as we speak and more and more each day.

Boys and girls, put down your Skilsaw and step away from the power outlet.

Now pick up a hand saw and join the revolution.

Thanks for the kind words Bill…this is the reason why I love sharpening saws.

🙂 -Matt

Published in: on June 23, 2011 at 6:25 pm  Comments (5)  

Sharpening for Miter Box Saws…

Its been a hectic few weeks in the shop since I hung my shingle out to offer saw sharpening and restoration services. I am very happy to say the response has been strong and steady, and I’ve been thoroughly enjoying my extra time in the shop.

Strangely enough, I have been receiving a lot of miter box saws for sharpening. This is both encouraging–as it is wonderful to see this long neglected work horse of the wood shop return to a place of respect–and dismaying–because filing 350+ teeth that have been neglected since the Eisenhower administration is a tedious process. That said, I am going to establish a new rate for miter box saws….in stead of the regular rate of $35 for a basic sharpening, I’m now charging $50 to tune up one of these big boys.

And just so those of you who already have miter box saws already with me aren’t crying bait-and-switch, don’t worry….this new price goes into effect on any saws received by me AFTER TODAY.

Anyway, that’s about it for now….keep your saws coming. My turn around time is hovering around the 2 to 3 week mark right now and things seemed to have leveled off, so it should be right around there for a while.

And a brief thanks to all of those who have wished me well in the new business endeavor…I greatly appreciate it! 🙂

-Matt

Published in: on June 20, 2011 at 11:20 am  Comments (2)  

What have we lost?

With the yard sale and flea market season now in full swing, old rusty tools shake off their dusty winter coats and wander out into the warm sunlight once more in hopes of finding a new home. Each Saturday morning in New England dawns with the promise of finding one of these long-lost treasures.

Last week, on one such morning, I stumbled across this apparently common table saw blade from a nest of saws in the bottom of an old tool chest…

I was first struck by it as the etch was very bold and it looked little used. As I picked it up to get a closer look at the etch, I then noticed what I first thought was a terrible sharpening job, but soon revealed itself to be a strange hybrid tooth geometry.

As soon as I got a chance to look more closely, I realized that this was no hack-sharpening job…this was a very deliberate filing…

It seems that the teeth are filed in groups of 2 + 5, meaning that there are two stout teeth followed by 5 finer teeth. The only difference I can see from the 2 teeth to the 5 is the degree of rake…the 2 teeth are more aggressively raked than the 5 teeth. This pattern repeats itself for the whole length of the saw…2 stout, 5 fine, 2 stout, 5 fine, etc, etc. You can see this very clearly in the picture above.

So what the heck is this all about?

The filing does appear to be factory original…meaning that this was the way the saw was filed by the Disston factory. The teeth are perfectly jointed and the fleam is very consistent on all of the teeth. Further, the saw has seen very little use…I know this because the blade is arrow straight (table, keyhole, compass and all narrow bladed saws are invariably found bent and kinked) and the etch is as bold as the day it was made.

If in fact the filing is not original and was filed by the owner, it was executed with such fine precision that it must have been done by a master filer, so that further suggests it was most deliberate. Either way, factory or custom, this tells us that someone very learned in the art of saw filing intended this tooth pattern….so there must be an advantage to it.

As I further inspected the saw, I tried to understand how this filing would benefit a table saw…

Table saws are intended to cut gentle curves in table tops and similar patterns, hence the narrow blade to follow a curved line. This means that in the wood, the teeth encounter grain parallel to the line and across it and thus make ripping and cross cuts. So does this strange tooth pattern help make both types of cut? Perhaps the aggressively raked teeth are intended to rip more effectively? But then why not file them straight across like true rip teeth?

I’ve never seen teeth like this before on a hand saw, and I’ve never read about them either. Disston and other saw makers patented many hybrid tooth patterns to improve the function of their saws…perhaps this is one more?

As I wonder about these odd teeth, it makes me think of what other knowledge of saw filing we’ve lost to history, perhaps never to find again.

In a way, we are starting over in this hand tool renaisance…we are reading Moxon and Roubo and Nicholson….all long dead. What secrets of working wood by hand died with them? Will we ever discover these secrets again?

What else have we lost to time and technology?

-Matt

Published in: on June 11, 2011 at 9:08 pm  Comments (16)  

NEW! Saw Sharpening Service!

A few months ago, I got an email out of nowhere from Mark Harrell of  BadAxeTool fame. In case you live under a table saw shaped rock and have never heard of him, Mark is the owner and saw smith behind the amazing Bad Axe Saws. His saws are the latest rage in Galootopolis, and if you’ve ever had the pleasure of using a Bad Axe, then you know why…they are astounding saws. Chris Schwarz  just wrote up a great review of Mark’s saws in the Fine Tool Journal that Wiktor Kuc was good enough to re-publish on his site here.

Anyway, after some initial emailing, Mark and I agreed to conduct a trade (in order to better gauge each others skills!) 😉 Mark sent me his new hybrid dovetail/tenon saw, and I sent him a nice 1880s vintage Disston D-8 rip saw (Mark’s favorite) that I had fully restored and sharpened up.

As soon as I received it, I was blown away by Mark’s saw…it has quickly become one of my go to back saws. And, much to my satisfaction, Mark was as equally impressed with my work on his new Disston ripper.

But, the story doesn’t end there….

A couple of days ago, Mark asked me to help him out…it seems he’s been building quite a back log of vintage saw restoration work and now has a 10 to 12 week waiting time. Not wanting to lose faithful customers, he asked me to help him out….here’s a copy of the email…

“Matt, help! I have a boatload of Bad Axe saws to deliver, and my backlog of vintage saw work is getting bloated to ridiculousness—I’m telling my customers they have to wait 10-12 weeks, and that’s just stupid. You are a fabulous saw doc—can I shift some of this load onto your shoulders? Be sure to post this message on your blog, so folks know this is coming from me, and that you da man when it comes to making saws sticky-sharp! Thanks! ~ Mark”

So, without any further blathering on my part, I’m happy to announce that I will now be offering full hand saw sharpening and restoration services here through the Saw Blog!

This was an easy decision for me to make, as many of you have been inquiring lately and my plan was to begin offering services soon anyway….Mark just has a knack for being persuasive enough to get me to fast forward my time-table a bit. 😉 And in addition to sharpening and restoration services, I’ll soon be offering fully restored and sharpened vintage hand saws for sale through the blog as well….stay tuned for more on that later.

For those re-directed here from Mark’s site, or my own readers and any one looking for saw sharpening and restoration, here is a quick listing of my rates. If you are interested or have questions, please email me at jcustomwoodwork@hotmail.com. One day soon, I will get around to launching a proper website and email link, but until then please email me at the above address.

My rates:

Basic saw sharpening: $35
This includes jointing, filing, setting and final sharpening

NOTE: For miter box saws, add $15.
 
Re-toothing: add $45
This is done entirely by hand and is an additional charge to the $35 noted above
 
Straightening saw plate: $25
This includes removing kinks and bends by smithing with a saw hammer
 
Saw tote repair: $30
This includes one repair of a break such as a broken horn, handle web, stress fracture or other break in the tote. For additional horn or repair, add $20.
 
Cleaning saw plate: $25
This includes rust removal, basic polishing to 400 grit and waxing. For heavy rust, additional polishing or resurrecting an etch, add $15.

Well, there you have it….feel free to email Mark as well with questions or contact me directly.

Right now, I’m offering a 1 to 2 week turnaround time for most saws…depending on the work.

As always, thanks for stopping by! 🙂

-Matt

Oh, and btw…here’s a pic of that saw I sent Mark…

Published in: on May 23, 2011 at 8:34 pm  Comments (16)  

Cleaning a saw plate…

If you’re not familiar with Josh Clark of Hyperkitten then do yourself a favor and surf on over to his site. Josh is without a doubt the coolest damn antique tool dealer this side of the Mississippi.

Case in point is the recent package of tools I got from Josh….he knows I am an avid saw-freak and always manages to find the nicest scratch for my particular itch. Josh can find just about anything, and his prices are extremely fair…even bordering on ridiculous at times.

As it were, this latest package of booty from Josh contained a couple very nice older English saws, and some saw parts…take a look…
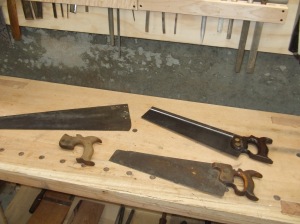
A tisket, a tasket, a mid-19th century English sash saw and other sundry goodies. 🙂

One of said goodies was a decent 24 inch Disston #7 saw plate with 8 points that was begging to be cleaned and re-united with a proper tote. So I figured this would be a great opportunity to blog about my methods of cleaning an old rusty saw plate and use the #7 as my model.

Over the last year or so, I’ve been experimenting with lots of different ways of cleaning saw plates, and recently, I have settled on a method and materials that are efficient and readily available.

To get started, you really only need two basic items….Simple Green cleaner and 400 grit abrasive paper….
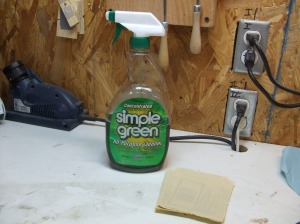
If you were to conduct a survey of those who clean saw plates regularly, you will find that most use mineral spirits as their abrasive lubricant, and no doubt MS works well on cleaning rust and grime, but it also excels at causing neurological damage….a fact that motivated me to find an alternative.

That search lead to all sorts of things, some petroleum distillates, some other types of solvents. Eventually, I found Simple Green. I recalled a member of WoodNet mentioning that he had used window cleaner with good results, and I thought how great it would be if I could find a regular cleaning product that would work on my saws, AND would have the added benefit of not shortening my life. So, I picked up a bottle for $5 and had at it…

…with outstanding results!!!! This stuff has  pleasant minty scent and cuts grime and rust just as well as mineral spirits….I truly cannot tell the difference in its ability of to disolve rust and grime, nor in the lubricating properties of the S.G. nor its ability to prevent clogging on the abrasive paper. This stuff rocks! So,  save your precious brain cells for beer drinking and retire your mineral spirits. 😉

The other item you’ll need is 400 grit abrasive paper….automotive wet/dry paper will hold up better, but Norton 3x aluminum oxide paper is also good. I use both, but tend to use more of the Norton stuff ’cause I can buy it in bulk from Woodcraft.

Now that we’re ready to start the saw cleaning, there’s just one more thing…make a paper pad for the saw plate….this is an important step that I recommend.

What is a paper pad and why should you use one? Well, a paper pad is basically just a piece of heavy craft paper cut in the shape of your saw plate, and you should use one because of this simple reason: as you’re sanding away on your saw plate, the abrasive breaks up and gets carried away by the slurry from the cleaner, and this loose abrasive invariably ends up getting all over the bench top you’re working on. The last thing you want is that loose abrasive getting embedded into the work surface you are pressing down on so that when you flip the nice clean saw plate over to work on the other side, you grind all that abrasive back into the fresh steel on the clean side and scratch up your saw. I used to go crazy trying to figure out complex ways of cleaning my bench top between sides until I came up with this little “saw pad” trick.

To make one, just lay your saw plate on an over sized piece of brown craft paper or resin flooring paper. Place your saw plate on the piece and trace around it with a razor….
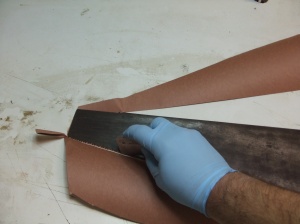
What you’re left with is a perfectly shaped paper pad for your saw…
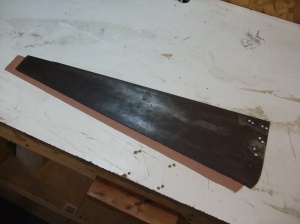
Now you’re ready to clean!

Place your saw plate on the pad and spray generously over the plate…squirt about four or five pumps worth for one side. Grab a square of 400 grit abrasive paper and start scrubbing. Always scrub with the length of the saw….NEVER scrub across the width of the saw. Steel is just like wood….always sand with the grain….cross grain scratches on steel are just as tough to get out!!!
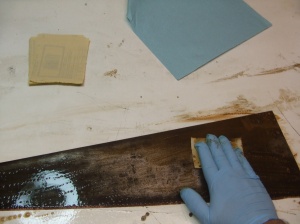
You’ll notice that I don’t use a sanding block here…and there’s an important reason why. If I was trying to preserve or uncover the etch on this saw, then yes, I would use a sanding block over the area of the etch…but ONLY over the area of the etch and not anywhere else on the plate. Why? 

I’ve found that using a backing block over the whole saw prevents the abrasive from getting into the subtle undulating texture of the saw plate, and you end up with a saw that has varying spots of cleanliness and polish…very uncomely. So use a block over the etch if you want to save it, or skip it all together if you are not worried about the etch. I’ll write about how to resurrect an etch in another post…that’s a fun little exercise that deserves its own spotlight. 🙂

Back to the saw….

Depending on how dirty and rusty your saw is, you’ll probably need to clean the slurry away and switch to a fresh sheet of abrasive paper every couple of minutes. Don’t be stingy with the abrasive….its cheap and this is drudgery you want to end ASAP, no doubt. Make sure you focus particular attention along the toothline…I always give the teeth special attention and use two sheets of abrasive to ensure I’m getting it good.

After about ten minutes of work and three or four squares of paper, here’s what you get…
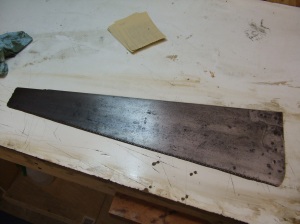
Now, as Pete Taran says on his site, no ones going to mistake your saw for brand new after cleaning, but then again, why would you want them to? Right? As you can see from the pic, the plate has a bit of sheen, but is free from loose dirt, rust, corrosion and crud. To me, this is the perfect balance of cleanliness, polish and vintage look….if you were to go one grade of abrasive finer, you’d start to really polish the high spots on the saw plate and it would begin to look strange….like a high-carbon skin disease. 😉 For me, 400 grit provides that perfect balance between too clean, and not clean enough.

Now you can flip the saw over and repeat the process on the other side. You’ll notice that your saw pad has gotten wet and started to dissolve along its edges, but no fear, it is still doing its job of keeping you saw off of loose abrasive that could now scratch it up.

After you finish the other side, make a point of abrading the edges of the plate as well….run the abrassive paper along the spine, nose and heel of the saw. The fine edges clean very quickly, and add another level of refinement to your new prize. You can even work a little folded up piece into the nib and clean it of the rust and grime.

Next, I take my saw over to the sink and rinse the hell out of it under warm water…yes, I said water. This is the easiest way to clean the saw of gunk, slurry and abrasive. Don’t worry about the water rusting your saw…you’re going to dry it next. I wipe down the saw right from the faucet, but don’t worry about getting every drop of water because now its over the shop vac, which I’ve reversed into a high-powered blower, and I blow it thoroughly dry…focusing on the bolt hoes and teeth, in particular.

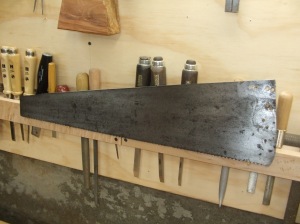
Here she is all cleaned up…
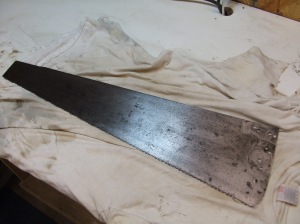
Now that she’s all nice and rust free, we want to keep her that way…a quick coat of paste wax will work wonders. I’ve tried different kinds of waxes, and they all work, but stay away from Briwax as it has caustic solvents like xylene and toluene that really serve no purpose here other than making you light-headed and possible giving you cancer. I like Minwax paste wax ’cause its cheap and readily available…
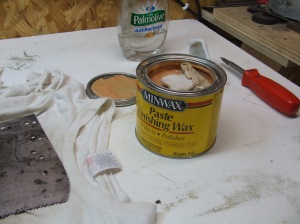
A minute to buff and dry, and here she is….ready for her next life…
Finally, I dig through my pile of orphaned saw totes and select a nice patinated apple tote with a lamb’s tongue. It’s not a historically correct match for this Disston #7, as its tote would be beech, but the two look so damn good together I just can’t help it…
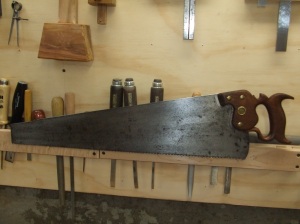
So, that’s about it…nice and simple. Like I mentioned at the start, I’ve tried all sorts of ways of cleaning saw plates, but most of them use too much materials for very little improvement over this simple approach.  One cleaner, one grit and you’re done.

As always, thanks for stopping by….

Happy sawin’

-Matt  🙂
Published in: on May 22, 2011 at 6:52 pm  Comments (18)